Pi Day (or March 14th for the 3.14 in Pi) never meant much to me. In school, I had a number of math teachers who tried to make it fun, but math was never my favorite class.
My brother Ron, however, loved it. At his last job, he had instituted Pi Day festivities, sending out invites months ahead and rallying everyone to join in on a silly mid-week celebration. In fact, he loved anything quirky or odd or just plain stupid like Pi Day. That's just the kind of guy he was.
Ron passed away suddenly last year, and pretty much nothing has been right since. He was one of my best friends, and I think he was finally starting to see me as an adult and not his stupid kid sister. He was the one who was constantly finding things to share with me - YouTube videos, new TV shows, weird catchphrases - and this past year has been awkward trying to find and enjoy these things on my own. I've been left with a lot of sad memories, which I know he would have hated.
Pi Day, though. That's a thing he loved for no real reason other than it was quirky. It's something I can be damned sure I'm going to celebrate for the rest of my life because it made him happy. And if pie can't fix things, even just for a little while, then I don't know what else can.
Because I'd much rather remember Ron on a day like today, for reasons like pie.
Bacon Chocolate Cream Pie 1 1/2 cups crushed Oreos (about 15 cookies broken in a food processor) 3 Tbsp butter, melted 1 pint heavy cream 1 Tbsp powdered sugar 1 tsp vanilla paste 1 package chocolate pudding, prepared as directed 5 pieces candied bacon, chopped
Mix together crushed oreos and butter until all the crumbs are moist. Gently pat into the bottom and sides of a pie dish. Refrigerate until ready to use.
In a mixer, whip heavy cream, powdered sugar, and vanilla until soft peaks form. Don't overwhip the cream. Gently fold half the whipped cream into the pudding and pour into the prepared pie dish. Top with the remaining whipped cream and decorate with the chopped bacon. Chill before serving.
Can you believe that there are people out there who haven't yet tried monkey bread?! (Unless, of course, you are one of those people. Then I guess you don't know what you're missing.) When I told my friends that I had been invited to create a dish with Jarlsberg Dip for their 29 Ways to Leap into Jarlsberg Dip promotion and giveaway and that my dish would be monkey bread, I got more than one blank stare in return.
First, they were confused by Jarlsberg Dip (as was I, before I made this dish). It's a creamy concoction featuring the wonderfully nutty and subtle Jarlsberg cheese. It's just starting to pop up in stores. I used the dip plus regular Jarlsberg cheese in my dish.
And then, more horrifyingly, they were confused by the term "monkey bread." They wanted to know why it was called that, and I couldn't give them a clear answer. (The Internets didn't help me here, either.) Once I put this bad boy in the oven and they started to smell it as it baked, though, they didn't care about the name anymore.
There was pretty much no talking after I pulled this out of the oven (unless you count the mumbles asking for the plate to be passed around the table again). I still don't think I've adequately answered their questions about the term monkey bread...
One note: When I made this, I only sprinkled some of the grated Jarlsberg in the bottom of the pan. When it came time to eat, the extra-cheesy bits were my favorite, and I was sad that I hadn't incorporated more into the final dish. Below I have amended my recipe to include more grated cheese, which would make your monkey bread look a little different than mine.
In a small pan, heat butter over medium heat until melted. Add garlic and heat until garlic begins to brown. Remove from heat and cool slightly. Brush interior of a bundt pan with garlic butter and set aside.
Divide dough into even pieces about the size of a golf ball. Flatten each ball and place a small dollop of Jarlsberg Dip in the center. Pinch together the edges of the dough around the dip to seal closed. Brush with melted butter and roll in grated cheese before positioning in the prepared bundt pan. Repeat with remaining dough. Once all the dough has been used, cover the pan and let rest on the counter for 30-60 minutes.
While the monkey bread is resting, preheat the oven to 400°. Bake for 25-35 minutes, or until the top is nicely golden. The monkey bread will rise a lot in the oven. Cool slightly before inverting onto a plate. Serve hot!
Jarlsberg wants you to Leap into Jarlsberg Dip too by sharing how you would use Jarlsberg Dip. The winner of the giveaway will win a tailgate tote stocked with Jarlsberg Lite Cheese, new Jarlsberg Cheese Dip, Snofrisk (a Norwegian style cream cheese), crispbreads, honey cremes, and honey vinegar. More details are available on their website.
Full Disclosure note: I was compensated for my time and groceries by Jarlsberg, but my opinions are all mine.
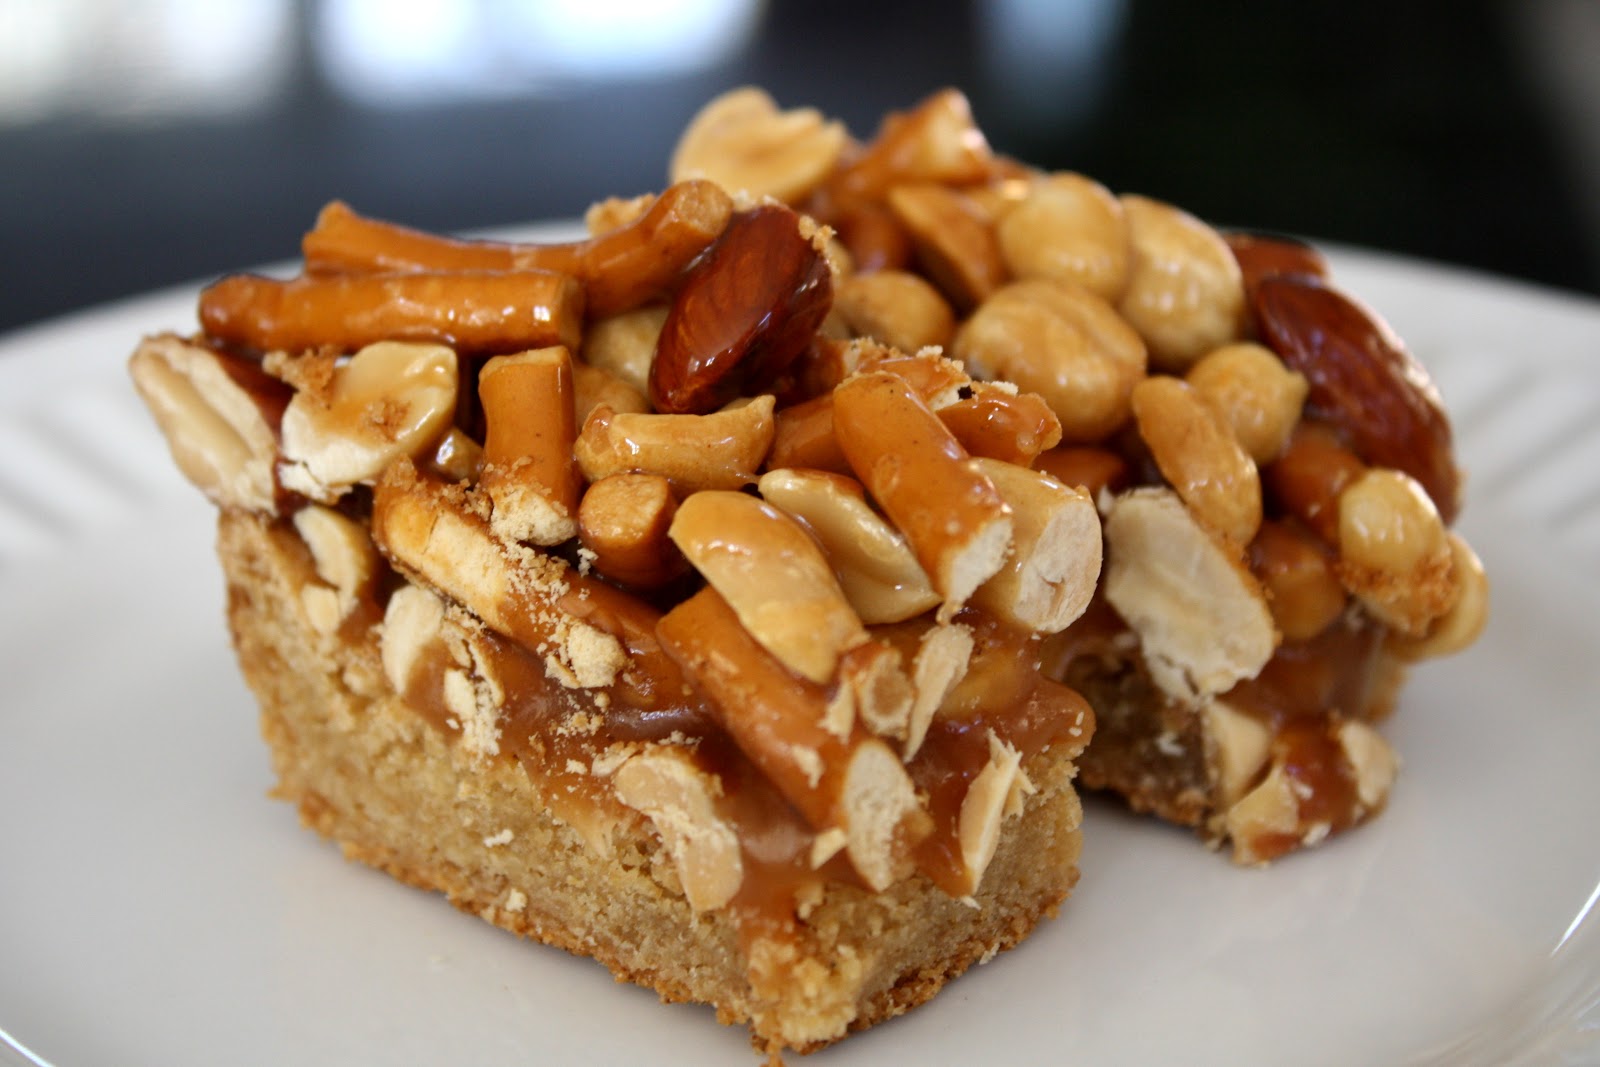
Have you ever looked at a recipe and known - just KNOWN - that you'd love it? I like to think that I feel that way often, but in reality, after executing the recipe (maybe not to the T, but pretty damn close), I'm disappointed. I was prepared for that to be the way with the Butterscotch Blondie Bars with Peanut-Pretzel Caramel (they really couldn't have come up with a shorter name?) in the December 2011 Bon Appetit. I added them to my list of holiday baking, making sure I had plenty of cookies that were guaranteed to be tasty, and I set to baking.
And holy CRAP, these things are good! They're a nice mix of sweet and salty (but not too salty), crunchy and chewy, love and more love. I changed the recipe a little bit (by adding almonds), and I would change it further to include more pretzels (I have done so in the recipe below). 2011 apparently was the year I became confident making caramel, and this was the perfect way to end the year on that account.
As far as serving goes, I ended cutting these up into tiny pieces because it's so rich. I originally cut 36 or 40 bars from the 13x9 pan, and I doubt I could have eaten one in a go. Cutting them up even further made them last throughout the holiday, as well.
Preheat oven to 350°. Line a 13x9 baking pan with parchment paper, leaving an overhang so you can pull the bars out easily later. Whisk together flour, baking powder, and salt and set aside.
Heat butter in a medium pan over medium heat, stirring until browned bits form at the bottom of the pan, about 7-8 minutes. Transfer to a large bowl (or bowl of a stand mixer). Add brown sugar and beat until combined and the mixture looks like wet sand. Add eggs and vanilla and beat until fluffy. Add dry ingredients and beat until smooth. Spread batter evenly in the prepared pan - it will puff as it bakes, so don't worry if you think you're spreading it too thin.
Bake 20-25 minutes, until golden brown and edges pull away from the sides of the pan. Cool completely before moving on to the topping.
Caramel Nut Topping
2 cups sugar
1/2 cup water
1/4 cup honey
1/2 stick (1/4 cup) unsalted butter
1/2 cup heavy cream
4 cups roasted peanuts (or a mix of peanuts and almonds)
2 cups salted pretzels, coarsely crushed
In a large saucepan, stir together sugar and water over medium-low heat until sugar dissolves. Increase the heat and boil without stirring (seriously, hands off!) until caramel is a deep amber (or caramel, if you will). This always takes longer than I think it should, but I'd rather it take a long time than burn the caramel right off the bat. Add honey and return to a boil, stirring, for about a minute. Add butter and stir until melted. Add cream and whisk until smooth (maybe wear a pot holder because this will steam and bubble A LOT). Add nuts and pretzels and mix until everything is covered in caramel. Pour over cookie and press down evenly. Chill until cool, then remove from pan and cut into bite-size pieces. Store in the fridge but bring to room temperature before serving.
When an event has a name like The Great Food Blogger Cookie Swap, you know it's going to be a big deal. In the past few weeks, hundreds of bloggers have been busy baking and mailing their holiday cookie creations. It's been a nice way of building community that I've enjoyed taking part in.
I had some trouble coming up with a recipe I wanted to use, but as soon as I tasted the Candy Cane Coal from Trader Joe's, I knew what I had to do. I used my favorite chocolate chip cookie recipe and simply swapped out the chocolate for the candy cane bits, and I had a perfectly festive cookie. I made these a little smaller than usual, so they were a little flatter and crispier, but just as tasty.
Now I just need to stock up on this candy so I can make sure I can make these cookies in the future!
And since this was a swap, I got some wonderful cookies in return. I received double chocolate coconut cookies (top left) from Elizabeth at A Chronic Venture, chocolate lemon ricotta cookies (top right) from Janet at Food Beautiful, and hazelnut linzer cookies (bottom) from Athena Plichta. You can be sure that I've made short work of all these cookies.
Chocolate Peppermint Cookies 2 cups all-purpose flour 1/2 teaspoon baking soda 1/2 teaspoon salt 3/4 cup unsalted butter, melted 1 cup packed brown sugar 1/2 cup white sugar 2 teaspoons vanilla bean paste 1 egg 1 egg yolk 3-4 ounces chocolate-covered candy cane bits (like Trader Joe's Candy Cane Coal)
Preheat the oven to 325°. Line cookie sheets with parchment paper.
Sift the flour, salt and baking soda and set aside.
Mix the sugars and butter just until thoroughly mixed, then add egg, yolk and vanilla and mix until creamy. Add the sifted ingredients and mix until just blended. Stir in the candy can bits, then drop dough in heaping tablespoons on a cookie sheet, about 2 inches apart, and bake for 15-17 minutes until golden and puffed. Slide the sheet of parchment off the cookie sheets and let the cookies cool without disturbing them for a few minutes. Once they have cooled slightly, move the cookies to a cooling rack.
Every Halloween, my friend Ann and I throw a party, filled with candy, dry ice, costumes, pumpkins, and lots of good food. We always have a good time coming up with items that are both delicious and spooky. Last year, I came across an idea somewhere (probably in one of the many Halloween magazines we pore over) to make tentacle breadsticks. I used store-bought pizza dough and managed to make some vaguely squiggly breadsticks, which we immediately dubbed Cthulhu Sticks (what, we're not super geeky or anything).
I was pleased enough with my experiment last year to try making them again, but not pleased enough. Instead of going the pizza dough route, I found a recipe for grissini (those long, thin Italian breadsticks). The dough is pretty simple to put together and is fairly forgiving of being worked, plus I found countless tips online about using a pasta machine to roll out and cut grissini so that they're uniform (and last year, the tentacles were anything but uniform).
I am so much happier with how the Cthulhu Sticks turned out this year. I opted to color half the dough black (I used gel food coloring, but you could use squid ink if you want something more natural), which I think gives them a spooky feel. Sea salt on the black ones and poppy seeds on the white ones add a look of suckers to the tentacles, but you can add whatever toppings (or even mix something into the dough) that you'd like.
Combine water, yeast, sugar, and 1/2 cup flour in a large bowl. Rest 10 minutes. Add remaining flour, oil, and salt (also any herbs or spices you could like. If coloring the entire batch, add food coloring now. Otherwise, wait until dough is more solid before kneading it in). Knead about 5 minutes, until dough is smooth and elastic. Place dough in a greased bowl, cover with plastic wrap, and let rise 1 hour.
Preheat oven to 400° and move oven rack to the top position.
Divide dough into four pieces. Using pasta roller, roll into a roughly 9x4 rectangle on the thickest or second-to-thickest setting. Cut with fettuccine cutter. Arrange grissini on parchment-lined baking sheets, keeping one end straight (so they can stand in a vase) and one end tentacle-y. Brush with olive oil and sprinkle on salt or additional toppings. Bake 8-10 minutes until golden (well, at least for the ones that aren't black) and cool on a wire rack.
To serve, arrange in a vase to get the full tentacle effect.
There comes a point after you've gone apple picking when you can't possibly eat another apple all by itself. And I love apples. Once you hit that point, you've got to do something else with them.
Enter this delicious salted caramel apple tart. Caramel and apples just go together so perfectly. I would have made caramel apples, but, well, that's just an apple covered in caramel. Not different enough from a plain apple for my apple-exhaustion. For the tart, I made homemade caramel, but used store-bought pie dough (to even out the workload). It was so good, I had to make a second one (good thing the pie dough comes two to a box).
Salted Caramel 1 cup water 2 cups sugar 1 cup heavy cream, warmed in microwave, plus more for brushing 1/4 tsp salt
Pour the water into a large saucepan, then pour the sugar into the center of the pan. Heat over medium heat until sugar dissolves. Cook on high without stirring until golden brown (have cream warmed and waiting for this). Remove from heat and carefully whisk in cream (wearing an oven mitt helps - the caramel will release a lot of steam). Boil to thicken slightly (remember the caramel will thicken further as it cools), then stir in salt. Let cool before using.
Salted Caramel Apple Tart 1 large or 2 small apples (eating apples work better than baking apples), sliced very thin salted caramel pie dough (1 disk of store-bought or half of your favorite recipe) sugar
Preheat oven to 450°.
Roll dough into a 1/4-inch thick circle. Arrange on a parchment-lined baking sheet. Spread caramel on dough, leaving an inch-wide margin around the edge. Lay apple slices overlapping in a fanned pattern around the dough (outer circle first, so the inner circle can overlap). Gently fold the edges of the dough up over the apples. Brush the top of the entire tart with heavy cream and sprinkle on some sugar. Place baking sheet in the center of the oven and bake for 20 minutes. Reduce heat to 375° and bake for another 15-20 minutes, or until the top of the tart is golden brown. Let cool before serving.
My father is the only person I know who actually likes fruitcake. He used to share the love of it with my grandmother (my mother's mother), and the two of them would share fruitcake in the winter and mocha almond ice cream in the summer.
A few years ago, when my friend Annabelle of Calamity Shazaam in the Kitchen game me a sliver of black cake (literally a sliver, but it was so rich, I ate it over a few days - ok, it was probably more like a few hours), I knew I had found a kind of fruitcake that I could get behind, and one that I wouldn't mind baking.
And then I promptly forgot about it.
The idea of black cake popped back into my head for some reason this summer, and so I decided I would embark on the task of making some for my father for his birthday. I got the fruit soaking in rum, and then I had a hard time finding enough time to bake the cake, so the fruit ended up sitting for 3 weeks or so. The recipe says 3 to 5 days, but from what I've read, it's really a the-longer-the-better thing. The recipe also calls for soaking the baked cakes in more rum, but I personally don't like cakes with too much of a strong rum flavor, so I left that part out. The cakes have been fine in the freezer/fridge without the extra alcohol to keep them.
Since giving these cakes to my father a little over a month ago, he's already finished two of the four and is currently making his way through the third. Guess I'll have to bake him some more for Christmas.
Fruit Base 1 lb pitted prunes, chopped 1 lb raisins, chopped 1 lb currants 1 bottle dark rum (I also added a few chopped apricots I had laying around)
Combine these in a large glass bowl at least 3 days before baking the cake. Cover and store in a cool, dry place.
Cake 1 lb brown sugar 1/2 cup boiling water 1 lb butter 1 lb sugar 8 eggs 2 tsp lime zest 2 tsp almond extract 1 Tbsp vanilla extract 1 lb flour 4 tsp baking powder 2 1/2 tsp mixed spice (I used something like 1 1/4 tsp cinnamon, 1/2 tsp ginger, 1/2 tsp nutmeg, 1/4 tsp cloves)
Blend fruit base in a blender or with an immersion blender. It should be thick and just a little chunky, like tomato sauce.
In a large pot, heat brown sugar over medium-high heat until caramelized (it will take on a darker quality). Add hot water carefully and mix well. Set aside to cool. This product is called browning. (I worked quickly so I didn't worry about it hardening, but apparently that can be an issue - watch out for it so you can get it out of the pan!)
Preheat oven to 250° (yes, I said two-fifty). Grease and line with parchment 4 8-inch round cake pans (you can play around the sizes and shapes as you'd like - I think this would be great in a bundt shape).
Cream together the butter and sugar. Add the eggs gradually, mixing to combine, then add zest and extracts. Sift together dry ingredients, then slowly add them to the creamed mixture. Mix in pureed fruit base and browning.
Pour batter into prepared pans (you don't have to worry too much about them rising). Bake for 3 hours (yes, 3 hours - it's only 250°, remember?). Cool in pans slightly before removing. If you're going to soak them in rum, now's the time.
There's something so nostalgic about peanut butter cookies. I don't recall making them all that often with my mother (I think we made them more often in my Girl Scout troop), and yet, they call to mind the days when my mittens were clipped to my coat and my feet would dangle off the edge of my chair.
My favorite peanut butter cookies are barely cookies - just peanut butter and sugar bound together with egg. Regular peanut butter cookie recipes seem to lack that real nutty flavor, so I usually use this recipe and forget about using flour all together.
As I looked for a cashew cookie recipe to make for a coworker's birthday (she eats cashews all the time, so I thought it would be a nice touch), I came across a recipe in an old Martha Stewart magazine that looked good. A few tweaks here and there (what, you expect me to buy the right kind of brown sugar?!), and I had to stop myself from devouring them all straight out of the oven. I had found a cookie that tasted strongly of nuts but still had flour (so they're less fragile than the flourless ones). This might just be my new go-to for nut butter cookies.
For this batch, I followed the instructions for mixing in the crushed nuts, then baking as balls and flattening (I used the bottom of a glass) a few minutes into baking. That worked fine, but they're not very pretty. I would suggest a few ways of making them look nicer. Try omitting the chopped nuts, then press a whole cashew into the middle of the cookie after flattening. Or leave in the chopped cashews, but flatten with a fork (a la old school peanut butter cookies). The original recipe called for a drizzle of caramel (which would, of course, make these very pretty), but I think the caramel would make the cookies too sweet, and you'd miss a lot of the cashew flavor.
Cashew Cookies(adapted from a Martha Stewart cookie magazine) (specifically this issue)
2 1/2 cups salted cashews (or 1 cup cashews and 1 cup cashew butter)
2 Tbsp canola oil (omit if using cashew butter)
1 stick salted butter, softened
3/4 packed dark brown sugar
1/2 cup sugar
1 large egg
1 tsp vanilla extract
1 2/3 cups flour
Preheat oven to 350°. Roughly chop 1 cup of cashews and set aside. In a food processor, chop remaining nuts until fine; add oil and process until creamy. (Obviously, skip this step if using jarred cashew butter).
Combine cashew butter, butter, and sugars in a bowl and beat until fluffy and uniform, about 2 minutes. Mix in egg and vanilla. Slowly add in flour and chopped cashews.
Roll dough into walnut-sized balls and place evenly (about 2 inches apart) on a parchment-lined baking sheet. Bake 6 minutes, then flatten slightly (see note above about different ways to flatten); bake for another 6 or 7 minutes or until edges just start to brown. Cool on a wire rack.
I don't know if my mother taught me this, or if it's something I just figured out on my own at a very young age, but the best way to make friends is with baked goods. Don't believe me? Try bringing a batch of something homemade along the next time you go somewhere and you don't know anyone.
Case in point: I've been enamored by a new sewing and craft shop in Cambridge since the moment I heard about it. Gather Here is, as the name implies, a place where people can get together to work on crafty projects. They have loads of classes and sewing machines that you can rent by the hour, as well as weekly gatherings where all are welcome. Anyone who knows me in real life, and many who know me only through the interwebs, know I'm a crafty person, but I'm especially obsessed with embroidery. And when I learned about Gather Here's weekly Saturday morning gatherings, how could I not attend, stitching in hand? (The piece above, a Tower of Babel meets Supernatural piece, was the one I dragged along.)
Of course, I was headed into a group that, for all I knew, were the best of friends who met every week, so I decided to whip up some cookies too. Hey, couldn't hurt, right? I have a load of basil growing in my garden right now, so I decided an update on one of my favorite recipes was in order.
(By the way, the Saturday morning group at Gather Here is awesome, and I'm looking forward to getting back there when my schedule allows. They also meet every other Thursday evening. And yes, everyone liked my cookies, so at the very least, I had that to talk about.) Lemon Basil Shortbread 2 sticks butter 3/4 cup sugar 1 large egg 1 tsp vanilla extract 2 1/2 cups flour 1 Tbsp finely chopped fresh basil 1 tsp lemon zest pinch of salt
Cream butter and sugar together until pale and fluffy. Mix in egg and vanilla. Add in flour, basil, lemon, and salt until combined. Halve dough and shape each half into a log about 1 1/2 inches in diameter. Wrap in parchment paper and freeze until firm, at least one hour.
Preheat oven to 375°. Cut dough into 1/4 inch thick rounds. Place rounds on parchment-lined cookie sheet, and bake until edges are golden, about 15 minutes. Do not let the cookies brown, just look for hints of color at the edges.
I have never been to New Orleans, nor have I ever had a real king cake, but that didn't stop me from making one when asked. My friend Ann, who has lived in New Orleans, was the one asking, and since I was using her flour and butter, I was happy to oblige.
I bought Joanne Chang's Flour cookbook before Christmas like everyone else in Boston, but I didn't get a chance to make anything from it until well into the new year. For some reason, I decided to skip any of the easier recipes and jumped right to brioche. The recipe came together with no problems and couldn't have been easier to follow. However, the recipe makes enough dough for two loaves, so half went to make a regular loaf and the other half went to the king cake.
Ann started listing things that would be tasty - I don't think this is actually based on a cake that she has eaten. She wanted chocolate and orange and, of course, something to use as the baby (the small token that brings good luck to whoever gets the piece with it). I ended up dividing the dough into three parts, rolling them into logs, adding a filling, then braiding them together. Ann tells me it was just like king cakes she had in New Orleans (only better, I would assume, because it had both chocolate and orange in it), so I'll just have to take her word for it.
I'm not going to give you the recipe for the brioche, since I used the one out of the Flour cookbook, so feel free to use your favorite brioche recipe. My recipe starts after the dough has had its first rise, but before it has been shaped and given its second rise. Seriously, though, check out Flour - it leaves me wanting to lick the pages every time I look at it.
Braided King Cake 1 brioche dough, after its first rise (half a recipe if using the Flour cookbook) 3 oz dark chocolate, chopped zest of 1 orange 1-2 Tbsp white sugar 1 large nut (almond, walnut, or pecan are good) 1 egg, beaten 1 cup powdered sugar 1/2 tsp vanilla milk (about 1 Tbsp) colored sugars (purple, green, and yellow)
Combine orange zest and white sugar in a bowl and set aside.
Divide dough into three equal parts and roll each into a long rope. Flatten the ropes - lay chocolate down the middle of one, orange sugar down the middle of another, and the nut somewhere in the third. Pinch sides together to seal the fillings in, then reroll if needed back into a rope shape. Braid the three ropes together, then bring the ends together to form a circle. Pinch the ends together to form a seamless circle. Place the loaf on a parchment-lined baking sheet, cover with plastic wrap, then let rise in a warm spot for 3-4 hours, until it has doubled in size.
Preheat oven to 350°. Brush loaf with egg. Bake for 35-45 minutes, until completely golden brown. Let cool before icing.
Whisk together the powdered sugar, vanilla, and a splash of milk until smooth. Add a little bit of milk at a time until the glaze is just slightly runny (you don't want it too watery, so go slow!). Drizzle over the king cake, then sprinkle on colored sugars.
One of the funny things about family traditions is that it can be hard to tell that they're specific to your family only. Growing up, we had cherry pie every February for Presidents' Day. I mentioned this recently to one of my brothers, and he said "I thought Mom just liked cherry pie." I mentioned to some other people that I wanted to bake a cherry pie soon for the holiday, and almost no one saw the connection. Was this just specific to my family then?
Since cherries, along with almost every other kind of fruit, are out of season in the winter, I like using frozen dark cherries. They don't have quite the same flavor as sour cherries (the usual kind used for pie), but the addition of lime gives the cherries more depth. Cherries and lime just taste so bright and fresh, the perfect thing for a winter day.
I haven't included a recipe for the dough because everyone seems to have their favorite pie crust. I like all-butter dough. I was a little pressed for time this time, though, so I used store-bought dough. The outcome wasn't quite as good, but I was still happy with the overall pie.
Cherry Lime Pie pie dough (use your favorite, enough for a double crust) 6 cups frozen dark cherries, defrosted 4 Tbsp cornstarch 1 1/4 cup sugar zest and juice of 2 limes 1 Tbsp butter, cut into small pieces milk sanding sugar
Preheat oven to 425°. Line a deep pie dish with dough (1/8th inch thick) and crimp the edges. In a large bowl, combine cherries, cornstarch, sugar, and lime zest and juice. Pour cherry mixture into pie dish and dot with butter. Roll out second half of dough to 1/8th-inch thick and, using a small star-shaped cookie cutter, cut out as many stars as possible. Arrange dough shapes over the top of the pie, overlapping so they can bake together. Brush top with milk and dust with sanding sugar.
Place pie plate on a rimmed baking sheet. Bake for 15 minutes, then reduce heat to 375° and bake for another hour, until the filling is set and bubbly. Use a pie crust shield or foil around the edges if the edges brown quickly. Let cool completely before serving.
Every January for the past few years, I spend a weekend at my friend Ann's house while her husband goes skiing in Vermont. Inevitably, the weekend turns into an all-you-can-bake affair, and I'm pretty sure Ann's favorite part is when I wake up before she does and bake something out-of-the-ordinary for breakfast. This year's treat? Mini cinnamon buns, as found on Can You Stay For Dinner?
I had been planning on making cinnamon buns for our extravagant breakfast, but all the recipes I was finding (including the one in the new Flour Bakery cookbook, which I ended up making other delicious things out of) involved yeast and many hours of rising time. So when I Stumbled (a great way to find food blogs, by the way) across this ready-in-half-an-hour recipe, I knew I had hit paydirt.
My buns didn't come out quite as pretty because I used a mini muffin pan, and the cups were the size of the sliced rolls, which didn't allow room for them to spread out. However, I think I prefer how mine looked - since they couldn't spread to the sides, they spread up, into little conical shapes, which made them look a little more substantial than they were.
Mini Cinnamon Bunsfrom Can You Stay For Dinner? 1 cup flour 1 tsp baking powder 1/4 tsp salt 3/4 cup heavy cream 2/3 cup packed brown sugar 1 1/4 tsp cinnamon 3 Tbsp butter, softened slightly 1 cup powdered sugar 1/2 tsp vanilla extract milk (about 1 Tbsp)
Preheat the oven to 400° F. Grease the cups of a mini muffin pan, and set aside. In a medium bowl, stir together brown sugar and cinnamon, and set aside.
Combine flour, baking powder, and salt in a large bowl. Stir in the cream and mix until the dough just pulls together and is soft and moist.
On a lightly floured surface, roll out the dough until you have a roughly 12x7 rectangle. Smear softened butter all over the surface of the dough, then sprinkle the brown sugar/cinnamon mixture evenly over the butter. Starting at one of the 12-inch sides, roll the dough up into a tight spiral.
Use a sharp knife to cut the roll into 24 small spirals. Place each spiral into a cup in the prepared baking pan. Bake about 12-15 minutes, until the buns are lightly golden. Cool on a wire rack.
While the buns are cooling, whisk together the powdered sugar, vanilla, and a splash of milk until smooth. Add a little bit of milk at a time until the glaze is just slightly runny (you don't want it too watery, so go slow!) Drizzle the glaze over the buns before serving.
Strawberries are the first local fruit to roll out in the spring, and there is truly nothing like a strawberry right off the vine. I'm dying to go strawberry picking, but for the meantime, pints of berries from the farmers markets that are just starting to open are just as good. And the perfect showcase for perfect strawberries is strawberry shortcake.
The best part of these strawberry shortcakes, though, was the whipped cream. It was the first time I had made whipped cream since getting my KitchenAid Mixer, and it was the easiest process ever. In the past, whipped cream would take upwards of 15 minutes, although it always felt more like 30, listening to the beaters of the hand mixer whapping against the side of the bowl. That cream was always underwhipped until it was suddenly curdled, never hitting that magical "stiff peaks" stage that's always spoken of. But this whipped cream? Three minutes from start to finish, and the addition of vanilla made it utterly heavenly. I could (and did) just eat it with a spoon.
Strawberry Shortcakes
Cream Biscuits 2 cups flour 1 Tbsp sugar 2 tsp baking powder 1/2 tsp salt 1 1/2 cups heavy cream
Preheat oven to 450°. Line a baking sheet with parchment paper and set aside.
Place flour, sugar, baking powder, and salt together in a large bowl and stir to combine. Pour in cream and mix until just incorporated. Turn out onto a piece of wax paper. Knead dough lightly, folding it in on itself to create layers. Using wax paper will allow you to knead the dough without adding extra flour. Pat dough into a rectangle about an inch thick and cut into 8 equal pieces.
Arrange biscuits evenly on the baking sheet. Bake for about 15 minutes or until lightly browned. Rotate pan halfway through. Cool biscuits on a wire rack.
Combine cream, sugar, and vanilla paste in a stand mixer. Mix together on medium-low for about a minute until frothy. Whip on high for 2-3 minutes, or until stiff peaks form. Do not overwhip or you'll get butter.
Wash strawberries and pat dry. Slice berries thinly. In a mixing bowl, sprinkle strawberries with 1 Tbsp sugar and stir. Add additional sugar if berries are tart. Refrigerate for at least an hour before use to allow a syrup to form.
Assembly Split biscuits in half and place bottoms on dessert plates. Top with a big dollop of whipped cream. Divide strawberries between the biscuits. Place tops of biscuits on the strawberries, then add another big dollop of whipped cream.
Around the time that we were planning our Dollhouse party, our friend April, who lives in LA but visits Boston every year around her birthday, said that she wanted a Whedon-verse themed party for her birthday. We spent the intervening months brainstorming party ideas based not just on Dollhouse, but also Buffy the Vampire Slayer, Angel, Dr. Horrible's Sing-Along Blog, and my beloved Firefly.
I knew from the very beginning that I wanted to make Fruity Oaty Bars, which has a commercial (above) that unlocks seemingly-crazy River's potential in Serenity. I brainstormed ideas for ages - I didn't want to just dye something with colors to make it match the commercial. I ended up combining a few recipes to include both fruit and oats, as well as to keep the colorful look.
The resulting Fruity Oaty Bars are pretty tasty and would make a great breakfast snack. The texture is similar to a muffin, and it's not terribly sweet. The blueberry and strawberry sections had the strongest taste, while the mango and kiwi sections just tasted vaguely fruity. I would make this again (probably with just a single fruit) just to have on hand for breakfast.
Of course, I had to wrap them individually to make them look like something shiny you would buy in the Core planets. I wanted to wrap them in gold foil, which I thought I had on hand but didn't. I opted, instead, for a copy of the local Chinese newspaper, which I grabbed from a newspaper box on my corner, and added a picture of the Fruity Oaty Bar Girls that I grabbed off the internet.
Fruity Oaty Bars 1 cup flour 1 tsp baking soda 1/2 tsp salt 3 cups old-fashioned oats 6 Tbsp butter, melted 2 eggs 2 tsp vanilla 1/2 cup sugar 1 1/3 cups fruit puree (your choice - I used 1/3 cup strawberry, 1/3 cup blueberry, 1/3 cup kiwi, and 1/3 cup mango) food coloring (optional)
Preheat oven to 350°. Line a glass baking dish with parchment paper, letting the edges overhang so you can remove the baked bars easily. I used a 7x12 baking dish, which seems like an odd size, so use something that is relatively long and narrow.
Combine flour, baking soda, salt, and oats and mix well. In a separate bowl, combine melted butter, eggs, vanilla, and sugar and mix well. Place each fruit puree in a different mixing bowl and divide butter/eggs/sugar mixture evenly between them; mix well (and add food coloring if you want the colors to be bold after baking). Divide flour/oat mixture evenly amongst the bowls and mix until all the dry ingredients are moistened.
Arrange the colored batters in long, thin stripes down the baking dish. The batter will be thick, so it shouldn't be too difficult to get the colors to line up next to each other. Make for 25-30 minutes, or until a toothpick stuck into the center comes out clean. Remove from pan and cool completely before cutting.
Of course, there was more to the Whedon-verse party than Fruity Oaty Bars. Everyone came in costume - we had Inara, Kaylee, Simon, River, Jayne, Drusilla, Faith trapped in Buffy's body, Faith, and the Man himself, Joss Whedon. We enjoyed Some Kind of Hot Cheese, burgers from Double Meat Palace, and Simon's birthday cake (in miniature, above). We also had tons of themed drinks: Kaylee's Gussied-Up Engine Wine Coolers (strawberry juice, vodka, and riesling), Lorne's Seabreezes (grapefruit juice, vodka, cranberry juice, wedge of lime), Mudder's Milk (depending on who was drinking, it was either beer or Baileys), Wonderflonium (bright greet kiwi strawberry fruit punch and gin, although any bright green juice would work), and my favorite, Badger's Finest (iced tea, applejack, and slices of green apple).
I think I'm like a lot people - I love cheese, but there are probably millions of varieties out there besides the ones I'm familiar with. I could probably count the types of cheese I buy on both hands. So when Ile de France offered to send me Chaumes, something I'd never heard of, I jumped at the chance.
Chaumes is a bit unique, but it's not wholly unlike other cheeses that I was familiar with. It's soft and creamy, much like brie (a tad harder, though), and has a bit of bite like a sharp cheddar. It has a great nutty flavor and a smell that is harsher than its taste. The orange rind is edible, but I wasn't wild about it.
The package arrived when I was babysitting my nephew and nieces, and they were eager to know what was inside. Luckily, they were more interested in the bubble wrap than the cheese itself, and I quickly stashed my goods in the fridge while they weren't looking.
Flash-forward to last night, when I offered to make dinner for my friends who were busy playing Dungeons and Dragons (I've played with them, but I'd rather be cooking than rolling the dice). I knew the group liked bread and cheese, and I was already making a cheesy pasta dish for dinner, so I decided to experiment with the Chaumes I had been sent and make rolls. The resulting bread had everyone clamoring for the extras, and there was discussion of when I could make them again. Fact is, they were so simple, it's only a matter of getting my hands on some more Chaumes!
Cheesy Pan Rolls with Chaumes 1 lb pizza dough (I used the bagged stuff from the supermarket) 8 oz Chaumes cheese 1/3 cup finely chopped parsley olive oil Parmesan cheese
Preheat oven to 400°. Brush olive oil onto the bottom and sides of a square baking dish.
Divide dough into 16 equal pieces, and cut cheese into 16 equal pieces. Roll each piece of dough into a ball and flatten slightly in your hand. Sprinkle a few pieces of parsley on the dough, top with a piece of cheese, and wrap the dough around the cheese, pinching the edges to seal. Place the roll seam-side down in the pan. Repeat with remaining ingredients. Brush finished rolls with olive oil and sprinkle remaining parsley over the top. Grate parmesan over the top (as much as you'd like). Bake for 15-20 minutes or until the top is golden brown.
I spent the last weekend in March at a fantastic non-food-related event and came home with a desire to bake. Strange? Not if you've met me.
PAX East (the East Coast offshoot of Seattle-based PAX) was host to 50,000 gamers (video games, tabletop games, board games, pretty much anything and everything) at the Hynes Convention Center, and for three days, I was surrounded by fellow geeks (in fact, I found myself on the "casual" gamer end of the spectrum amongst this group). I took some embroidery with me to keep me occupied while we waited in lines (I don't have a Nintendo DS, which seemed like the most common thing people were using in line, so this kept me busy).
On Saturday morning, while waiting in line for a panel with Foxtrot author Bill Amend, a guy walked through the crowd with a bag filled with little tin-foil-wrapped goodies, taking donations for Child's Play and handing out cookies. He was part of what I later learned is called the Cookie Brigade. I handed him a donation and he asked what I wanted.
"Chocolate chip, oatmeal, sugar, experimental..." he said.
"Experimental? Sure, why not," I told him, and while my friend dug into a serviceable chocolate chip cookie, I quickly unwrapped a golden cookie studded with little flecks of what looked like corn flakes.
But those were no corn flakes. Instead, they added a nice crunch to an otherwise crumbly shortbread and a healthy dose of salt to something that was fairly sweet.
"Potato chip cookie!" I called out, and there were "oooh"s of interest from those around me.
So a few days after the con ended (I needed some time to recuperate!), I started searching for potato chip cookie recipes. Most of what I found included pecans, but the one I had included no nuts, and frankly, was better for the omission. I jury-rigged my recipe from the ones I found to be more like the one I ate at PAX, and I'm convinced that this is pretty close to that cookie.
I used Trader Joe's Reduced Guilt potato chips because, despite saying "lightly salted" on the bag, they are one of the saltiest chips out there (they're also not greasy, which is a plus). They are my second favorite potato chips, but my favorite (Cape Cod Potato Chip's Robust Russet) are very dark in color and I thought they would look burnt in the cookies. This is a great way to use up the chip crumbs at the bottom of the bag, so feel free to use whatever you have on hand.
These cookies are great with just the chips, but they're even better with a little bit of chopped chocolate. I tried them with both milk and dark chocolate, and I think I liked the milk better.
Cream together butter and powdered sugar. Add vanilla and mix until combined. Add flour and and mix until completely combined. Add crushed potato chips and chocolate and mix until incorporated. Roll dough into walnut-sized balls (use your best Ralph Wiggum voice to say "These cookies give my hands ouchies!") and place on a parchment-lined baking sheet about an inch apart. Bake for 15-17 minutes, or until golden. Cool on a baking rack before serving; store in an airtight container.
I don't know if guys get like this, but all the girls I know have days when there just isn't enough salt in the world. Chips, of course, are a good source of salt - I rank chips based on how salty they are. Any form of potato - fried, mashed, roasted - also works well for salt distribution. Breads, however, are usually not so salty (especially bread from Tuscany, which contains NO salt - blech!). Enter the pretzel - doughy, with a chewy crust, and as much salt as you can heap on.
I've been hearing for a while from a number of bloggers that pretzels are SO EASY to make, but I had my doubts. How easy can something be if it involves making a dough, letting it rise, shaping, boiling, AND baking? Surprisingly, they are easy. Even with all those steps, the process goes quickly, and the outcome - trays full of pretzels - is worth the effort. It takes me about 2 hours to make a batch, but then I have more pretzels than I know what to do with - definitely a good use of my time.
I'm interested in trying some variations on this recipe - like adding chopped herbs to the dough or sprinkling some grated parmesan on top - but really, these pretzels are pretty perfect just covered in salt. Feel free to vary the amount you sprinkle on - I've made them with double the amount that's on the one in the picture above, and that was just a little too salty for me. Soft Pretzels(from Alton Brown's recipe) 1 1/2 cups warm water 1 Tbsp sugar 2 tsp kosher salt 1 package active dry yeast 4 1/2 cups flour 2 ounces butter, melted 10 cups water 2/3 cups baking soda 1 egg yolk, beaten with 1 Tbsp water Kosher salt
Combine the water, sugar, salt, and yeast together in the bowl of a stand mixer and let sit for 5 minutes or until it begins to foam. Add flour and melted butter and mix on low speed with the dough hook attachment until well combined. On medium speed, knead until the dough is smooth and doesn't stick to the walls of the bowl, about 5 minutes. Remove the dough from the bowl, give the inside of the bowl a good spray with Pam or other cooking spray, and put the dough back in. Cover with plastic wrap and let rise for 50-60 minutes, or until it has doubled in size.
Preheat the oven to 450°. Line 2 baking sheets with parchment paper and spray with cooking spray; set aside. Bring the 10 cups of water and the baking soda to a rolling boil in an 8-quart pot.
Turn the dough out onto a cutting board and divide into equal pieces. I've made about 16 that come out to about the size of my palm, but you can make as few as 8 (like Alton does) or as many as 24. Roll each piece of dough out into a thin rope, no more than a half-inch in diameter. To shape the pretzels, form the rope into a U-shape, cross the ends over each other twice (like a little twist), then fold the twisted part down onto the curve of the U. Form all the pretzels before moving onto the next step.
Boil the pretzels in the water-baking soda combo one at a time for 30 seconds. Use a large slotted spatula or spoon to remove them. Lay the boiled pretzels on the prepared baking sheets, brush them with egg yolk, and sprinkle with kosher salt. Bake until a dark golden brown, about 10-12 minutes (add a few minutes if you make them larger). Transfer to a cooling rack.
I read a lot of food blogs - probably too many. Often, I find myself skimming through my Google Reader without paying too much attention to details (sometimes even just looking at the pictures). When I'm in that kind of mood, it takes a special recipe to pull me out of my stupor.
And that's exactly what happened when I saw these Irish Cream Brownies on Baking Bites. I wasn't craving brownies until I saw the recipe, but as soon as I did, I HAD to have them. Luckily, I can just say the word brownie to my friend Ann and she's on board. We baked up a batch on Saturday night, to pair with Chipotle burritos, video games, and Caprica. Our group likes to talk, but we were silent as soon as these brownies came out.
I loved them so much, in fact, that I had to make them again a few nights later. We didn't have regular Baileys in the house, but we did have some of the mint Baileys. How awful could that end up, I wondered. How about even better? I'm sure the caramel Baileys would be amazing in these as well.
Man, are these tremendous brownies. Usually when something says it's Irish Cream (or Baileys) flavored, it means it has a hint of Irish Cream. Not these - these taste like the real thing (maybe because it uses the real thing?). Baking Bites included a glaze for the brownies, but I didn't feel it was needed (plus it didn't work for me). All on their own, the brownies form a crisp, thin crust while staying dense and fudge-like inside. I like these so much, they may become my default brownie recipe. What better thing to make for Saint Patrick's Day? My mother was asking for the recipe before she had finished her first bite...
Irish Cream Brownies (adapted from Baking Bites) 1/3 cup butter, melted 2/3 cup sugar 1/3 cup cocoa powder 1 egg 1 tsp vanilla 1/2 cup Irish Cream liqueur (like Baileys) - the flavored Baileys work well too 1/4 tsp baking soda 1/4 tsp salt 3/4 cup all purpose flour
Preheat oven to 350°. Line a 9x9 baking pan with tin foil and grease lightly; set aside.
In a medium bowl, whisk together melted butter, sugar, and cocoa powder. Add egg and vanilla and whisk until combined. Whisk in liqueur until smooth (this will take a minute). Add in baking soda and salt, then whisk to distribute. Add flour and whisk until there are no streaks of flour left. Pour batter into prepared pan and bake for 20-25 minutes, or until a toothpick inserted into the brownies comes out with only a few crumbs, no uncooked batter. Remove using the tin foil and let cool on a wire rack.
I don't get confused easily (at least, I don't think I do), but there are a few things I can never get right. Using affect when I mean effect, for example (although I'm generally pretty snobby about my grammar, this one just doesn't stick). In that same vein, macaroons drive me crazy. Coconut vs. almond, macaroon vs. macaron - it's enough to drive someone to bake.
For years, I maintained that I didn't like macaroons due to a distinct distaste for coconut, and then these crazy chewy cookies made with almond paste appeared. But wait - almond macaroons are not the same as macarons, the fussy little cookies made with almond flour and sandwiched with delicious fillings? You know, I've stopped caring what I call them - these cookies are just plain delicious.
These almond macaroons turn out flat, with a crispy edge and a chewy middle. Use alcohol-free vanilla to make them gluten-free!
Almond Macaroons 3 1/2 ounces almond paste (half a 7oz package) 1/2 cup confections' sugar pinch of salt 1 large egg white 1/4 tsp. vanilla sliced almonds
Preheat oven to 300° and line a baking sheet with parchment paper. Mix together almond paste, sugar, and salt until crumbly, about 3 minutes. Add egg white and vanilla and mix until smooth and thickened, about another 3 minutes. Drop by teaspoon onto baking sheet, about two inches apart. It doesn't look like you have much dough at all, but this should make 12-13 cookies. Arrange two slices of almond on top of each cookie. Bake until golden, 20-25 minutes. Slide parchment off baking sheet and cool completely.
Early in December, my father and I dropped my mother off at the Cambridge Center for Adult Education (for a class on gold leafing, which she has wanted to learn for ages), then headed off to tour the Taza Chocolate factory (along with roughly the entire chocolate-loving population of the greater Boston area). In pure Augustus Gloop fashion, we tasted everything they had to offer, including their cacao nibs (both plain and panned in chocolate). I could have bought one of everything in the store, but keeping my budget in mind, I grabbed a tin of nibs, intending to do some baking with them, and headed on my way.
Cacao nibs are chocolate that has been roasted and hulled but not yet ground into a paste, mixed with sugar and other ingredients, and formed into chocolate as we know it. They're not sweet, and they're not particularly chocolatey either. Instead, they're crunchy and nutty, and I usually taste an overtone of banana as well. I like Taza's a lot. They roast their chocolate carefully and in small batches - they know what they're doing.
Onto the baking. My father had been pestering me for a while about making biscotti, something I'd never done before, but he had seen on America's Test Kitchen and wanted to do. I quickly became hell-bent on including cacao nibs and pistachios (my father's favorite nut) in some way. I did a quick search and found these fabulous biscotti from Brownie Points.
These cookies came out perfectly, crispy and packed with flavor. I really like the combination of salty pistachios, crunchy cacao nibs, and sweet and chewy orange peel. I especially enjoyed eating them after they had sat on top of my coffee for a while, like in the picture above - the steam softened them up a bit without needing to dip them into the coffee. Feel free to play with the ratio of pistachios, cacao nibs, and orange peel - include as much or as little as you like. I prefer lots of little bits in my biscotti, so I added probably a little more than is called for in the recipe below. The base of the recipe is great, too, so you can use it with whatever mix-ins you feel like.
Pistachio Orange Peel Cacao Nib Biscottiadapted from Brownie Points 2 eggs 1 stick (1/2 cup) butter, softened 1 tsp vanilla 1 tsp baking powder 1/4 tsp salt 1 cup sugar 2 1/2 cups flour 3/4 cup chopped pistachios 3/4 cup chopped candied orange peel 1/2 cup chopped cacao nibs
Preheat oven to 350°.
Mix together the eggs, butter, and vanilla until well combined. Add in the baking powder, salt, sugar, and flour, and mix thoroughly. If the dough is too sticky, add a little more flour. Add in the pistachios, orange peel, and cacao nibs and mix until distributed evenly.
Divide the dough into two halves and form them into two logs (kind of like the shape of a ciabatta loaf). Place logs on a parchment paper-lined baking sheet and bake for 30 minutes, until the top is slightly golden brown. Remove the logs from the oven and allow to cool completely.
Lower oven temperature to 325°. Cut logs into 1/2-inch thick slices. Place the slices back on the baking sheet, cut sides up (you may need a second baking sheet for this). Bake biscotti for 10-15 minutes on each side, then cool before eating.