Showing posts with label cookies. Show all posts

Wednesday, January 4, 2012

Caramel Nut Bars


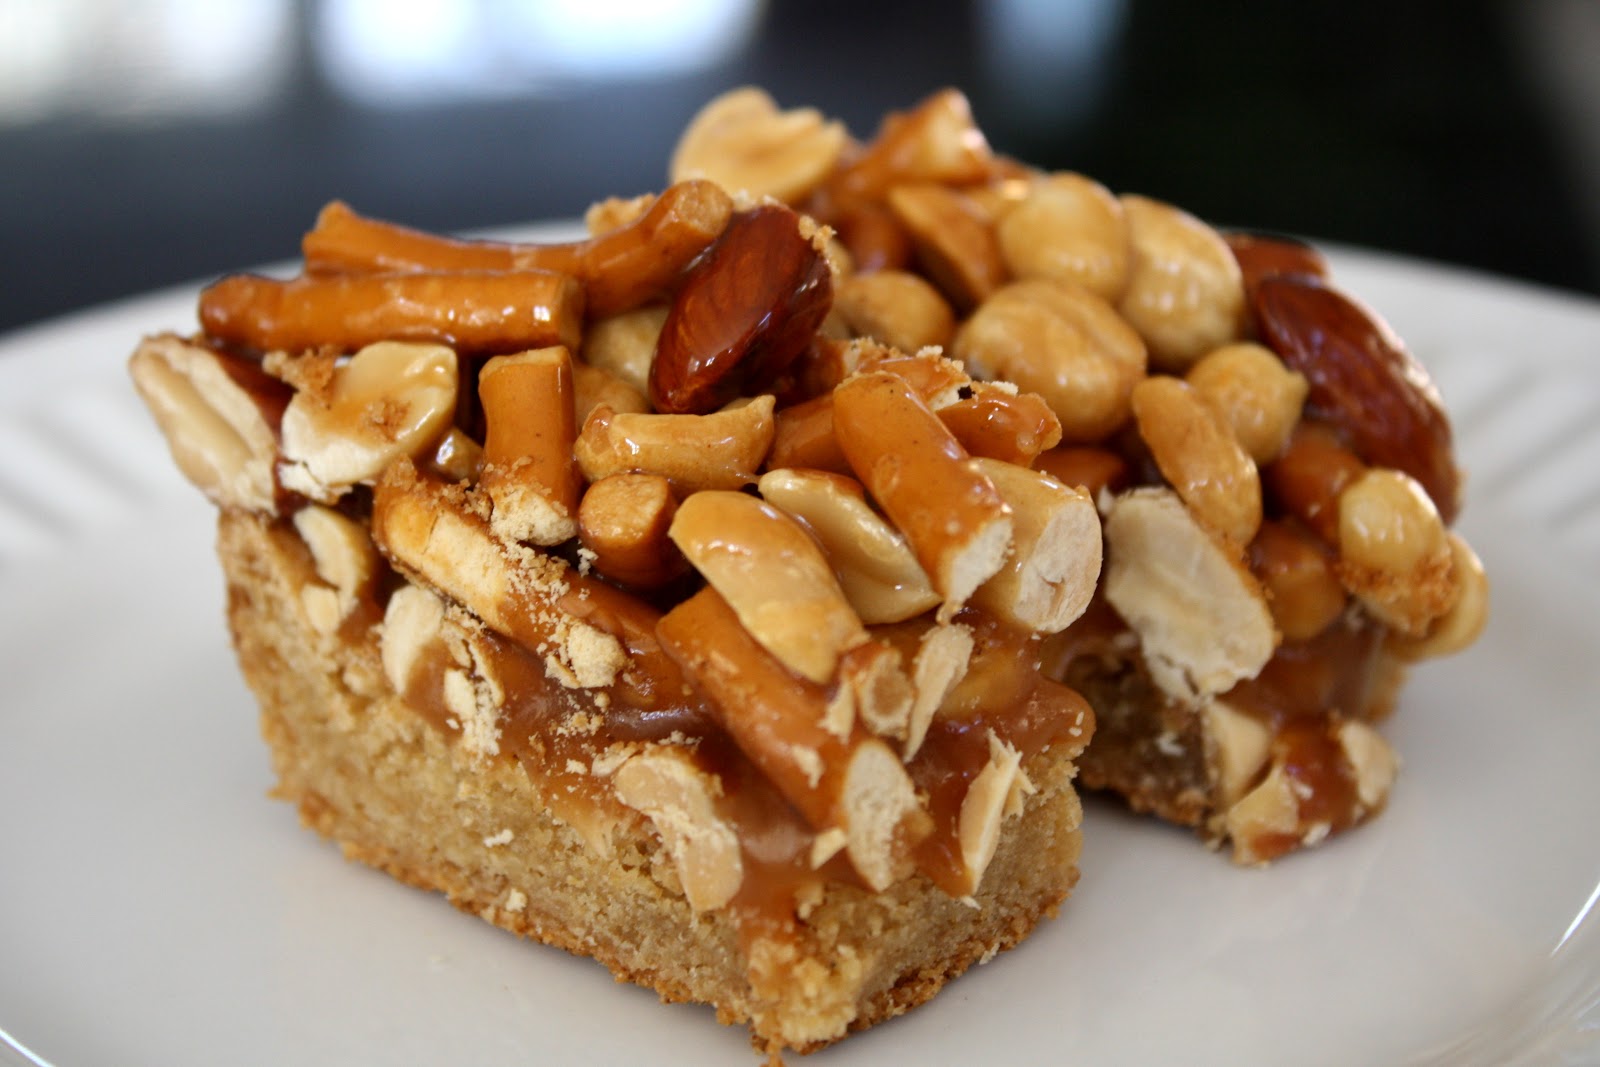
Have you ever looked at a recipe and known - just KNOWN - that you'd love it? I like to think that I feel that way often, but in reality, after executing the recipe (maybe not to the T, but pretty damn close), I'm disappointed. I was prepared for that to be the way with the Butterscotch Blondie Bars with Peanut-Pretzel Caramel (they really couldn't have come up with a shorter name?) in the December 2011 Bon Appetit. I added them to my list of holiday baking, making sure I had plenty of cookies that were guaranteed to be tasty, and I set to baking.

And holy CRAP, these things are good! They're a nice mix of sweet and salty (but not too salty), crunchy and chewy, love and more love. I changed the recipe a little bit (by adding almonds), and I would change it further to include more pretzels (I have done so in the recipe below). 2011 apparently was the year I became confident making caramel, and this was the perfect way to end the year on that account.

As far as serving goes, I ended cutting these up into tiny pieces because it's so rich. I originally cut 36 or 40 bars from the 13x9 pan, and I doubt I could have eaten one in a go. Cutting them up even further made them last throughout the holiday, as well.


Caramel Nut Bars (adapted from Bon Appetit)

Blondie bar
1 1/2 cups flour
2 tsp baking powder
1 tsp kosher salt
1 1/2 sticks (3/4 cup) unsalted butter
2 cups packed brown sugar
2 eggs
1 tsp vanilla extract

Preheat oven to 350°. Line a 13x9 baking pan with parchment paper, leaving an overhang so you can pull the bars out easily later. Whisk together flour, baking powder, and salt and set aside.

Heat butter in a medium pan over medium heat, stirring until browned bits form at the bottom of the pan, about 7-8 minutes. Transfer to a large bowl (or bowl of a stand mixer). Add brown sugar and beat until combined and the mixture looks like wet sand. Add eggs and vanilla and beat until fluffy. Add dry ingredients and beat until smooth. Spread batter evenly in the prepared pan - it will puff as it bakes, so don't worry if you think you're spreading it too thin.

Bake 20-25 minutes, until golden brown and edges pull away from the sides of the pan. Cool completely before moving on to the topping.

Caramel Nut Topping
2 cups sugar
1/2 cup water
1/4 cup honey
1/2 stick (1/4 cup) unsalted butter
1/2 cup heavy cream
4 cups roasted peanuts (or a mix of peanuts and almonds)
2 cups salted pretzels, coarsely crushed

In a large saucepan, stir together sugar and water over medium-low heat until sugar dissolves. Increase the heat and boil without stirring (seriously, hands off!) until caramel is a deep amber (or caramel, if you will). This always takes longer than I think it should, but I'd rather it take a long time than burn the caramel right off the bat. Add honey and return to a boil, stirring, for about a minute. Add butter and stir until melted. Add cream and whisk until smooth (maybe wear a pot holder because this will steam and bubble A LOT). Add nuts and pretzels and mix until everything is covered in caramel. Pour over cookie and press down evenly. Chill until cool, then remove from pan and cut into bite-size pieces. Store in the fridge but bring to room temperature before serving.

    Monday, December 12, 2011

    The Great Food Blogger Cookie Swap 2011 - Chocolate Peppermint Cookies

    When an event has a name like The Great Food Blogger Cookie Swap, you know it's going to be a big deal. In the past few weeks, hundreds of bloggers have been busy baking and mailing their holiday cookie creations. It's been a nice way of building community that I've enjoyed taking part in.

    I had some trouble coming up with a recipe I wanted to use, but as soon as I tasted the Candy Cane Coal from Trader Joe's, I knew what I had to do. I used my favorite chocolate chip cookie recipe and simply swapped out the chocolate for the candy cane bits, and I had a perfectly festive cookie. I made these a little smaller than usual, so they were a little flatter and crispier, but just as tasty.

    Now I just need to stock up on this candy so I can make sure I can make these cookies in the future!

    And since this was a swap, I got some wonderful cookies in return. I received double chocolate coconut cookies (top left) from Elizabeth at A Chronic Venture, chocolate lemon ricotta cookies (top right) from Janet at Food Beautiful, and hazelnut linzer cookies (bottom) from Athena Plichta. You can be sure that I've made short work of all these cookies.

    Chocolate Peppermint Cookies
    2 cups all-purpose flour
    1/2 teaspoon baking soda
    1/2 teaspoon salt
    3/4 cup unsalted butter, melted
    1 cup packed brown sugar
    1/2 cup white sugar
    2 teaspoons vanilla bean paste
    1 egg
    1 egg yolk
    3-4 ounces chocolate-covered candy cane bits (like Trader Joe's Candy Cane Coal)

    Preheat the oven to 325°. Line cookie sheets with parchment paper.

    Sift the flour, salt and baking soda and set aside.

    Mix the sugars and butter just until thoroughly mixed, then add egg, yolk and vanilla and mix until creamy. Add the sifted ingredients and mix until just blended. Stir in the candy can bits, then drop dough in heaping tablespoons on a cookie sheet, about 2 inches apart, and bake for 15-17 minutes until golden and puffed. Slide the sheet of parchment off the cookie sheets and let the cookies cool without disturbing them for a few minutes. Once they have cooled slightly, move the cookies to a cooling rack.

    Thursday, August 25, 2011

    Cashew Cookies

    There's something so nostalgic about peanut butter cookies. I don't recall making them all that often with my mother (I think we made them more often in my Girl Scout troop), and yet, they call to mind the days when my mittens were clipped to my coat and my feet would dangle off the edge of my chair.


    My favorite peanut butter cookies are barely cookies - just peanut butter and sugar bound together with egg. Regular peanut butter cookie recipes seem to lack that real nutty flavor, so I usually use this recipe and forget about using flour all together.


    As I looked for a cashew cookie recipe to make for a coworker's birthday (she eats cashews all the time, so I thought it would be a nice touch), I came across a recipe in an old Martha Stewart magazine that looked good. A few tweaks here and there (what, you expect me to buy the right kind of brown sugar?!), and I had to stop myself from devouring them all straight out of the oven. I had found a cookie that tasted strongly of nuts but still had flour (so they're less fragile than the flourless ones). This might just be my new go-to for nut butter cookies.


    For this batch, I followed the instructions for mixing in the crushed nuts, then baking as balls and flattening (I used the bottom of a glass) a few minutes into baking. That worked fine, but they're not very pretty. I would suggest a few ways of making them look nicer. Try omitting the chopped nuts, then press a whole cashew into the middle of the cookie after flattening. Or leave in the chopped cashews, but flatten with a fork (a la old school peanut butter cookies). The original recipe called for a drizzle of caramel (which would, of course, make these very pretty), but I think the caramel would make the cookies too sweet, and you'd miss a lot of the cashew flavor.


    Cashew Cookies (adapted from a Martha Stewart cookie magazine) (specifically this issue)


    2 1/2 cups salted cashews (or 1 cup cashews and 1 cup cashew butter)

    2 Tbsp canola oil (omit if using cashew butter)

    1 stick salted butter, softened

    3/4 packed dark brown sugar

    1/2 cup sugar

    1 large egg

    1 tsp vanilla extract

    1 2/3 cups flour


    Preheat oven to 350°. Roughly chop 1 cup of cashews and set aside. In a food processor, chop remaining nuts until fine; add oil and process until creamy. (Obviously, skip this step if using jarred cashew butter).


    Combine cashew butter, butter, and sugars in a bowl and beat until fluffy and uniform, about 2 minutes. Mix in egg and vanilla. Slowly add in flour and chopped cashews.


    Roll dough into walnut-sized balls and place evenly (about 2 inches apart) on a parchment-lined baking sheet. Bake 6 minutes, then flatten slightly (see note above about different ways to flatten); bake for another 6 or 7 minutes or until edges just start to brown. Cool on a wire rack.


    Tuesday, July 26, 2011

    Lemon Basil Shortbread

    I don't know if my mother taught me this, or if it's something I just figured out on my own at a very young age, but the best way to make friends is with baked goods. Don't believe me? Try bringing a batch of something homemade along the next time you go somewhere and you don't know anyone.

    Case in point: I've been enamored by a new sewing and craft shop in Cambridge since the moment I heard about it. Gather Here is, as the name implies, a place where people can get together to work on crafty projects. They have loads of classes and sewing machines that you can rent by the hour, as well as weekly gatherings where all are welcome. Anyone who knows me in real life, and many who know me only through the interwebs, know I'm a crafty person, but I'm especially obsessed with embroidery. And when I learned about Gather Here's weekly Saturday morning gatherings, how could I not attend, stitching in hand? (The piece above, a Tower of Babel meets Supernatural piece, was the one I dragged along.)

    Of course, I was headed into a group that, for all I knew, were the best of friends who met every week, so I decided to whip up some cookies too. Hey, couldn't hurt, right? I have a load of basil growing in my garden right now, so I decided an update on one of my favorite recipes was in order.

    (By the way, the Saturday morning group at Gather Here is awesome, and I'm looking forward to getting back there when my schedule allows. They also meet every other Thursday evening. And yes, everyone liked my cookies, so at the very least, I had that to talk about.)

    Lemon Basil Shortbread

    2 sticks butter
    3/4 cup sugar
    1 large egg
    1 tsp vanilla extract
    2 1/2 cups flour
    1 Tbsp finely chopped fresh basil
    1 tsp lemon zest
    pinch of salt

    Cream butter and sugar together until pale and fluffy. Mix in egg and vanilla. Add in flour, basil, lemon, and salt until combined. Halve dough and shape each half into a log about 1 1/2 inches in diameter. Wrap in parchment paper and freeze until firm, at least one hour.

    Preheat oven to 375°. Cut dough into 1/4 inch thick rounds. Place rounds on parchment-lined cookie sheet, and bake until edges are golden, about 15 minutes. Do not let the cookies brown, just look for hints of color at the edges.

    Monday, December 20, 2010

    Holiday Castle Siege

    What would Christmas be without creating something ridiculous out of cookie? A few years ago, there was the Great Gingerbread Massacre, and last year, my friends and I recreated the movie Zombieland with gingerbread. After "castle siege" was suggested this year, I knew I would have to attempt it. I immediately googled "gingerbread trebuchet" and got some great ideas. (Click the picture above to embiggen.)

    (By the way, in my googling, I found the most amazing recreations of scenes from the Lord of the Rings, done entirely in candy. Check them out.)

    My friend Melody was along for the whole ride, and many of her suggestions are what made this thing so awesome. While I was baking the pieces, she pulled out a toy horse cookie cutter and said that we had to make a Trojan horse. Anyone who knows me knows that I am a HUGE nerd about the Trojan war, so how could I not make one after she pointed it out? I put a little platform between the two horse cookies and loaded it up with little men. There's even a ladder on the back for them to climb.

    There are just so many awesome things in this scene, and they make me laugh just thinking about them. There's a prisoner who's being set on fire, men on top of the wall with vats of hot pitch, a ladder thrown over the castle wall, a guy sneakily trying to set the castle on fire, and a few men impaled by thrown javelins.

    And of course, there's the gingerbread trebuchet. The thing actually moves!! The counterweight is a little house-shaped box attached to a pretzel rod with a toothpick, and the basket is a mini cupcake wrapper attached to the pretzel with string licorice and loaded with Whoppers. The pretzel itself is attached to the base via a wooden skewer, and it moves up and down. The only thing missing is a mechanism to secure the basket pre-firing. Hey, I'm no engineer.

    By the way, this whole thing was made with one batch of my favorite gingerbread and one batch of royal icing. It was all pretty easy (although I am aware that my definition of "easy" is a bit skewed.)

    I love having fun with gingerbread. Have any good gingerbread creations to share?

    Wednesday, September 8, 2010

    Come to the Dark Side, We Have Cookies

    Does my family know me or what? My birthday was last month, and about 93% of the presents I received were cooking related (and this isn't the first time this has happened). One of my brothers, who taught me all the geeky things I needed to know as a child, got me these awesome Star Wars cookie cutters from Williams-Sonoma. I had been lusting after these on a recent W-S visit (along with these nifty pie molds, of which I received three) and was so happy to unwrap the package and have Yoda, Darth Vader, a Stormtrooper, and Boba Fett staring back at me.

    And these cookie cutters are fabulous! I took the time to frost them all with royal icing to give to an even geekier friend for his birthday, but by frosting them, you lose all the neat details that the cutter adds (plus, they look great without adding so much work).

    This was only the second time I've worked with royal icing, but this project was a million times more ambitious than my first adventure. Nevertheless, I have a better handle on the process and will surely be using it again.

    Royal Icing
    4 cups powdered sugar, sifted
    4 Tbsp meringue powder (can be found at a craft store if not at the supermarket)
    6 Tbsp water

    Combine the ingredients in the bowl of a standing mixer. With the paddle attachment, mix on low speed for 7-8 minutes, until icing is more matte than glossy. This icing is still a little too stiff to work with, but it's better to mess around with smaller quantities than the whole batch. Keep icing covered to prevent from hardening.

    Coloring: Gel coloring is a better choice than liquid dyes, but it's a little more expensive. The gel texture doesn't mess with the consistency of the icing the same way that liquid does. Either way, add a little at a time until you reach the desired color.

    To pipe: Add water as needed to reach a consistency that will pipe easily (as stiff as you can make it while allowing it to be piped out of a bag in a continuous line). If the icing becomes too watery, add a little powdered sugar at a time and mix. Put some of the icing in a piping bag fitted with a small round tip and outline the area you want to be filled.

    To flood: Water down the remaining colored frosting until it reaches a consistency that can run off the back of a spoon. Put icing in a squeeze bottle, or if you're like me and don't have all the proper tools on hand, use a spoon. Add icing to the areas that have been outlined and use a toothpick to push the icing into all the corners and to pop any air bubbles that might come up. Let dry for at least a few hours before adding any other details on top.

    Store in an airtight container when frosting is not in use.

    I learned all about royal icing from Annie's Eats - check out the blog to get more details from someone who knows much more about the topic than I do.

    Tuesday, April 6, 2010

    Potato Chip Cookies

    I spent the last weekend in March at a fantastic non-food-related event and came home with a desire to bake. Strange? Not if you've met me.

    PAX East (the East Coast offshoot of Seattle-based PAX) was host to 50,000 gamers (video games, tabletop games, board games, pretty much anything and everything) at the Hynes Convention Center, and for three days, I was surrounded by fellow geeks (in fact, I found myself on the "casual" gamer end of the spectrum amongst this group). I took some embroidery with me to keep me occupied while we waited in lines (I don't have a Nintendo DS, which seemed like the most common thing people were using in line, so this kept me busy).

    On Saturday morning, while waiting in line for a panel with Foxtrot author Bill Amend, a guy walked through the crowd with a bag filled with little tin-foil-wrapped goodies, taking donations for Child's Play and handing out cookies. He was part of what I later learned is called the Cookie Brigade. I handed him a donation and he asked what I wanted.

    "Chocolate chip, oatmeal, sugar, experimental..." he said.

    "Experimental? Sure, why not," I told him, and while my friend dug into a serviceable chocolate chip cookie, I quickly unwrapped a golden cookie studded with little flecks of what looked like corn flakes.

    But those were no corn flakes. Instead, they added a nice crunch to an otherwise crumbly shortbread and a healthy dose of salt to something that was fairly sweet.

    "Potato chip cookie!" I called out, and there were "oooh"s of interest from those around me.

    So a few days after the con ended (I needed some time to recuperate!), I started searching for potato chip cookie recipes. Most of what I found included pecans, but the one I had included no nuts, and frankly, was better for the omission. I jury-rigged my recipe from the ones I found to be more like the one I ate at PAX, and I'm convinced that this is pretty close to that cookie.

    I used Trader Joe's Reduced Guilt potato chips because, despite saying "lightly salted" on the bag, they are one of the saltiest chips out there (they're also not greasy, which is a plus). They are my second favorite potato chips, but my favorite (Cape Cod Potato Chip's Robust Russet) are very dark in color and I thought they would look burnt in the cookies. This is a great way to use up the chip crumbs at the bottom of the bag, so feel free to use whatever you have on hand.

    These cookies are great with just the chips, but they're even better with a little bit of chopped chocolate. I tried them with both milk and dark chocolate, and I think I liked the milk better.

    Potato Chip Cookies
    2 sticks salted butter, softened
    1 cup powdered sugar
    1 tsp vanilla extract
    1 1/2 cups all-purpose flour
    1 1/2 cups crushed potato chips
    1/2 cup chopped chocolate (optional)

    Preheat oven to 350°.

    Cream together butter and powdered sugar. Add vanilla and mix until combined. Add flour and and mix until completely combined. Add crushed potato chips and chocolate and mix until incorporated. Roll dough into walnut-sized balls (use your best Ralph Wiggum voice to say "These cookies give my hands ouchies!") and place on a parchment-lined baking sheet about an inch apart. Bake for 15-17 minutes, or until golden. Cool on a baking rack before serving; store in an airtight container.

    Tuesday, February 9, 2010

    Almond Macaroons

    I don't get confused easily (at least, I don't think I do), but there are a few things I can never get right. Using affect when I mean effect, for example (although I'm generally pretty snobby about my grammar, this one just doesn't stick). In that same vein, macaroons drive me crazy. Coconut vs. almond, macaroon vs. macaron - it's enough to drive someone to bake.

    For years, I maintained that I didn't like macaroons due to a distinct distaste for coconut, and then these crazy chewy cookies made with almond paste appeared. But wait - almond macaroons are not the same as macarons, the fussy little cookies made with almond flour and sandwiched with delicious fillings? You know, I've stopped caring what I call them - these cookies are just plain delicious.

    These almond macaroons turn out flat, with a crispy edge and a chewy middle. Use alcohol-free vanilla to make them gluten-free!

    Almond Macaroons
    3 1/2 ounces almond paste (half a 7oz package)
    1/2 cup confections' sugar
    pinch of salt
    1 large egg white
    1/4 tsp. vanilla
    sliced almonds

    Preheat oven to 300° and line a baking sheet with parchment paper. Mix together almond paste, sugar, and salt until crumbly, about 3 minutes. Add egg white and vanilla and mix until smooth and thickened, about another 3 minutes. Drop by teaspoon onto baking sheet, about two inches apart. It doesn't look like you have much dough at all, but this should make 12-13 cookies. Arrange two slices of almond on top of each cookie. Bake until golden, 20-25 minutes. Slide parchment off baking sheet and cool completely.

    Tuesday, February 2, 2010

    Girl Scout Cookie Creations 2010

    As I mentioned last year, I am a Girl Scout. Like, still a Girl Scout. Like, a lifetime member of Girl Scouts. So when Girl Scout cookie time rolls around, I'm always excited to buy a box or twelve. (It helps that my niece is now a scout and gave me a box of Thin Mints for Christmas - like a drug pusher, she is. First taste is free...)

    Girl Scouts of Eastern Massachusetts has, for a few years now, put together an event called Girl Scout Cookie Creations. They ask local chefs to create recipes using Girl Scout cookies, and then they throw a big bash where people consume inordinate amounts of sugar. This year, they split the event into two nights - one in Salem and one in Boston. I only attended the Boston event, but from looking at the recipes, the night in Salem sounded just as delicious.

    My friend Melody, who went through all 12 years of Girl Scouts with me, and I arrived right at the beginning of the event and quickly got to tasting. Our first bite was the Peanut Butter Terrines (featuring Peanut Butter Sandwiches and Shortbread) from Turner Fisheries (above). And from the first bite, it was clear that this was the dessert to beat. With the Shortbread as a base and the peanut butter puree on top, this was a perfect little treat. The puree was just sweet enough, and I loved the textural difference between the puree and the shortbread base.

    Next up were Kickass Cupcakes' Caramel Delites Cupcakes. They were, like all of Kickass' cupcakes that I've tried, fine - a little dry and with waaay too much frosting. They used crushed Caramel Delites as a filling to the cupcakes, which added a nice crunch to the cake.

    I was already feeling like I'd had too much sugar, and we were only 2 tables in! Some water cured me, though, and we proceeded to the Au Bon Pain table. Frankly, I wasn't expecting much of anything from the bakery chain, but their granola bars were fantastic. I tried the Caramel Delites bars, which were hearty, filled with granola, almonds, coconut, honey, and cookie chunks. I would most certainly buy this at an Au Bon Pain, and I might even make these at home. I didn't try the Peanut Butter Chocolate Banana bars (featuring Peanut Butter Patties) because I don't think bananas have a place in dessert, but Melody didn't like it as much as the Caramel Delites bar.

    While enjoying our granola bars, we both thought we smelled something savory, like chicken wings. We took a swing by the cheese table in the front of the room, but there was nothing that looked like it would be giving off such tempting aromas. So we headed back to try the next sample, and lo and behold, Locke-Ober had ribs! Served with grits and sprinkled with crushed Shortbread, the ribs were delicious, but a bit of a cop-out. The cookies had almost nothing to do with the dish, making them an odd choice for a cookie-inspired event.

    Ready for more sugar, we headed on to Aura's table, where they were offering something called the Layered Lemon Ice Box. The layered dessert was served in a push-pop, which made it all that more fun to eat. It consisted of layers of lemon curd, pureed blueberries, whipped ricotta, and crushed Lemonades cookies. The push-pops were fun, but they made it difficult to taste the layers together - instead, I really only tasted one at a time as I pushed the bottom up. Definitely tasty, though, and this has me wanting to make some citrus curd sometime soon.

    Aquitaine was up next, and although I don't like bananas, I bravely tried their Boston Banana Cream Torte, featuring Peanut Butter Sandwiches and Daily Go Rounds. I can't say much beyond that it was good despite the bananas, and if this is your kind of thing, it looks very simple to make at home. But I do normally enjoy Aquitaine's desserts, so this is really just a personal preference thing.

    Finally, we visited Tremont 647 for some Peanut Butter Cheesecake with Butterscotch Sauce, featuring Peanut Butter Sandwich cookies. After the first bite, I had a problem on my hands. Turner Fisheries had been on the top of my list the entire evening, and then suddenly, with a different take on peanut butter, Tremont 647 was turning everything on its head. I enjoyed the cheesecake, but the butterscotch sauce really tied the whole dish together.

    Melody and I needed another break from the sweet, so we enjoyed some cheese and discussed whom to vote for. It seemed clear that we would vote for either Turner Fisheries or Tremont 647, and in the end, we went with Turner Fisheries because their dessert was something completely different. While Tremont 647's cheesecake was very tasty, it was cheesecake, which can take on any number of flavors, whereas the cookie puree in the Turner dish was something out of the ordinary.

    And it looks like we picked a winner. Turner Fisheries got the crowd votes, and Aura won the judges over with their lemon curd push-pops. I was surprised that none of the chefs went for Thin Mints, the most popular of the cookies, but after stating that one of the mint offerings last year tasted like toothpaste, maybe I'm not so surprised. Is it sad that I'm already looking forward to next year?

    And don't forget to buy Girl Scout cookies! If your local scout doesn't knock on your door, you can search for booth sales here. Girl Scouts of Eastern Massachusetts also collect boxes of cookies for soldiers overseas, so buy an extra box to send to a soldier.

    Wednesday, January 27, 2010

    Pistachio Orange Peel Cacao Nib (Kitchen Sink?) Biscotti

    Early in December, my father and I dropped my mother off at the Cambridge Center for Adult Education (for a class on gold leafing, which she has wanted to learn for ages), then headed off to tour the Taza Chocolate factory (along with roughly the entire chocolate-loving population of the greater Boston area). In pure Augustus Gloop fashion, we tasted everything they had to offer, including their cacao nibs (both plain and panned in chocolate). I could have bought one of everything in the store, but keeping my budget in mind, I grabbed a tin of nibs, intending to do some baking with them, and headed on my way.

    Cacao nibs are chocolate that has been roasted and hulled but not yet ground into a paste, mixed with sugar and other ingredients, and formed into chocolate as we know it. They're not sweet, and they're not particularly chocolatey either. Instead, they're crunchy and nutty, and I usually taste an overtone of banana as well. I like Taza's a lot. They roast their chocolate carefully and in small batches - they know what they're doing.

    Onto the baking. My father had been pestering me for a while about making biscotti, something I'd never done before, but he had seen on America's Test Kitchen and wanted to do. I quickly became hell-bent on including cacao nibs and pistachios (my father's favorite nut) in some way. I did a quick search and found these fabulous biscotti from Brownie Points.

    These cookies came out perfectly, crispy and packed with flavor. I really like the combination of salty pistachios, crunchy cacao nibs, and sweet and chewy orange peel. I especially enjoyed eating them after they had sat on top of my coffee for a while, like in the picture above - the steam softened them up a bit without needing to dip them into the coffee. Feel free to play with the ratio of pistachios, cacao nibs, and orange peel - include as much or as little as you like. I prefer lots of little bits in my biscotti, so I added probably a little more than is called for in the recipe below. The base of the recipe is great, too, so you can use it with whatever mix-ins you feel like.

    Pistachio Orange Peel Cacao Nib Biscotti adapted from Brownie Points
    2 eggs
    1 stick (1/2 cup) butter, softened
    1 tsp vanilla
    1 tsp baking powder
    1/4 tsp salt
    1 cup sugar
    2 1/2 cups flour
    3/4 cup chopped pistachios
    3/4 cup chopped candied orange peel
    1/2 cup chopped cacao nibs

    Preheat oven to 350°.

    Mix together the eggs, butter, and vanilla until well combined. Add in the baking powder, salt, sugar, and flour, and mix thoroughly. If the dough is too sticky, add a little more flour. Add in the pistachios, orange peel, and cacao nibs and mix until distributed evenly.

    Divide the dough into two halves and form them into two logs (kind of like the shape of a ciabatta loaf). Place logs on a parchment paper-lined baking sheet and bake for 30 minutes, until the top is slightly golden brown. Remove the logs from the oven and allow to cool completely.

    Lower oven temperature to 325°. Cut logs into 1/2-inch thick slices. Place the slices back on the baking sheet, cut sides up (you may need a second baking sheet for this). Bake biscotti for 10-15 minutes on each side, then cool before eating.

    Monday, January 11, 2010

    Pretty Sure I Asked for Pecan Sandies

    My brother Ron has the amazing ability to create earworms and catch phrases. No, create is the wrong word - but he is able to pick phrases that stick with you no matter how hard you try to forget them. Usually, our friends and I are left repeating these phrases long, long after he's forgotten all about them. Case in point: At the supermarket this weekend, my friend Ann held up a bottle of Chi-Chi's salsa and asked if we could bring it into the house without guaranteeing a bout of Chicken and Chi-Chi's Cyborg.

    Anyway, one of Ron's many earworms, and one that has yet to absent itself from even his own mind, is "Pretty sure I asked for pecan sandies." The line is from the first few minutes of the first episode of American Dad, which I think is even funnier than it's sibling, Family Guy. Roger, the alien that the Smiths keep hidden in their house, gets upset when he finds out the wife didn't buy him cookies (video below). And my brother has been repeating this phrase since 2005, when the episode aired. Somehow, we all still find it funny!


    And so I've been meaning to bake pecan sandies for Ron for ages. I didn't actually get around to it until this Christmas, though, when I added it onto my long list of cookie requests. In all honesty, I made them as a joke, but almost everyone amongst my friends and family liked them the best (out of 10 or so different kinds of cookie!). I guess that means pecan sandies are now part of my regular rotation of cookies, so there's no way in hell this ear worm is going away anytime soon.

    Pecan Sandies
    adapted from Food & Wine
    2 sticks unsalted butter, room temp
    1/3 cup sugar
    1/2 tsp salt
    1 tsp vanilla extract
    2 cups flour
    1 cup chopped pecans (I like to use a nut chopper)

    Beat together butter, sugar, and salt until light and fluffy. Beat in the vanilla extract, then slowly add the flour, scraping down the sides of the bowl as you go. When the dough starts to pull together, add the pecans and mix until the nuts are evenly incorporated. Divide the dough in half, form into 2-inch-thick logs, wrap in wax paper, and freeze at least two hours, or overnight.

    Preheat oven to 350° and line a baking sheet with parchment paper. Cut logs into 1/4-inch-thick slices and arrange on baking sheets. Bake 25-30 minutes, until the edges begin to turn golden brown. Repeat with remaining dough.

    Friday, December 25, 2009

    Merry Christmas!

    Merry Christmas! I've been spending the past week baking more cookies that I thought we could eat (although they've been slowly disappearing, so I may be wrong with my assessment). I had hoped to post some cookie recipes before Christmas, but the time got away from me. There will definitely be recipes before the new year, though!

    Thursday, November 12, 2009

    Cooking with Harbor Sweets

    Twitter has led me to some of the coolest events as of late. A while ago, I saw a tweet from Harbor Sweets, an amazing local candy company, announcing a cooking class that they would be hosting in their factory. Cooking with Sweet Sloops, my favorite of their chocolates, made with almond toffee crunch, white and dark chocolate, and pecans? Sure - imagine the amazing cookies you could make with them! But no, the class was going to focus on a full menu of recipes, not just desserts. When I saw the words "Sweet Sloops Pad Thai," I knew I had to go.

    So last Saturday, after getting more than a little lost, we arrived at Harbor Sweets' factory in Salem only a few minutes late. The small room was packed with tables and people, and we squeezed into our seats as the chef starting talking. The afternoon was led by Chef Bill, a local personal chef, and he taught us a lot about cooking with humor and verve.

    We started with dates stuffed with goat and gorgonzola cheeses, bacon, and Sweet Sloop Crunch. I thought I wouldn't like these, but surprisingly, this was my favorite dish of the day. The saltiness of the cheese and bacon were married perfectly with the sweetness of the candy and the dates, and the bacon and the Sweet Sloops added plenty of texture to an otherwise soft dish. These would be perfect for a holiday appetizer, as you can make them ahead and just pop them in the oven to warm through. Since this was my favorite, the recipe is below.

    We then moved onto Pad Thai. A lot of people seemed skeptical about pairing candy with pad thai, but I thought it would be a great match - there's already sugar and peanuts in pad thai, so why not? In fact, Chef Bill took out both the sugar and the peanuts and used the Sweet Sloops to provide those flavors - it worked perfectly, although I can't see making this routinely. It's definitely a conversation piece, though, and would be great to wow your friends and family with.

    For dessert, we actually tried two different dishes. Chef Bill passed around Toll House cookies that were made with Sweet Sloops Crunch instead of chocolate chips. They were delicious, as I expected them to be, and is probably the recipe that most of the attendees are going to try at home. We also had Bananas Foster, with Sweet Sloops Crunch used as a garnish. (Above, Chef Bill gets ready for some flambe.) I'm not crazy about cooked bananas, but I loved the Sweet Sloops over ice cream.

    So, as if I didn't already love Sweet Sloops, I now have even more excuses to buy them.

    Can you see the chocolate all melty and delicious in that picture?

    Dates with Goat and Gorgonzola Cheese, Bacon, and Sweet Sloops Crunch
    4 oz goat cheese, room temperature
    3 oz gorgonzola cheese, room temperature
    3 strips bacon, cooked and crumbled
    1/4 cup Sweet Sloops Crunch
    15 Medjool dates

    Preheat oven to 350°.

    Mix together the two cheeses, then mix in cooked bacon and Sweet Sloops Crunch. Make a slit in the top of each date, keeping the bottom intact, and remove the pit. Put one teaspoon of the cheese mixture into each date. Place dates on a sheet pan and bake for less than 5 minutes, until cheese are heated through.

    Thursday, October 29, 2009

    Bloody Eyeball Caramels and Other Halloween Chocolates

    When I was a kid, my mother and I would make chocolates about once a year, usually around Valentine's Day. She'd fill an electric skillet with water and we'd fill glass jars with different colors of chocolate buttons, rest them in the water, and watch them melt. I don't think I was very patient with the whole process of filling the molds, putting them in the freezer to harden, then shaking the finished chocolates out, because there was chocolate involved! What kind of kid is patient when there's a big vat of chocolate in front of them?!

    I don't know where that electric skillet has gone, and I use all my glass jars for canning nowadays. It's only been in the past couple of years that I've gotten back to chocolate making. I still only do it once or twice a year, but I've found that I'm much more patient with the process. And I love the whapping sound the molds make as you hit them on the counter to release any air bubbles.

    Last year, I made gravestones, spider webs, and pumpkin cups. I couldn't find my molds this year, so I had to go out and buy some more (I know, rough stuff). When I saw these eyeballs, I knew immediately what to do.

    These probably took longer than they should have to make, but that was because I was pretty detailed in painting on the red. I think they look pretty damn creepy, and seeing a whole bowlful stare back at me makes my skin crawl. And I really like the effect of blood-red caramel in the middle (just add some red food coloring to melted caramels, then let harden to cut).

    These chocolate-coated Oreos took much less time because they aren't so detailed, but the mold only made four at a time, so there was still a lot of waiting involved. They're a little happier and good for anyone who's too squeamish to eat a bloody eyeball.

    Do you make chocolates? Any favorite shapes/holidays/occasions for them?

    Saturday, October 3, 2009

    Can-O-Rama Challenge - Raspberry Peach Jam

    Late in August, Linsey from Cake and Commerce helped put together Boston's Can-o-rama Cantacular, a day filled with learning about all types of canning and general "putting up" of food. I'm sure I wasn't the only one who left eager to put food in jars.

    As part of the event, Linsey has started a monthy (or so) canning challenge on her blog. The first challenge was "summer in a bottle," since we were on the tail end of summer produce. I scoped out the farmer's market and decided on white peaches and raspberries for my jam. When I said I didn't need the paper pints for the raspberries, the woman behind me was concerned that they'd all get crushed on the way home. "I'm just going to mush them up to make jam," I told her, and she gave me a look like I was crazy. Crazy like a fox, perhaps...

    I have about 8 half-pint and 4 quarter-pint jars of this to keep me in a summery frame of mind throughout the winter. One jar didn't seal correctly in the waterbath, so I stuck it in the fridge. When the urge for more peanut butter cookies struck, I baked my cookies, putting thumbprints in the middle instead of using a fork to push them down, pulled out my jam, and made delicious peanut butter and jelly bites. Yum!

    Summery Raspberry Peach Jam
    4 cups fresh raspberries
    6 cups fresh peaches, chopped
    5 cups sugar
    1/4 cup bottled lemon juice
    pinch of salt

    Combine ingredients in a heavy-bottomed pot and mash fruits up. Let stand 30 minutes or so. Bring to a boil, stirring occasionally, and cook for about 40 minutes. As the jam thickens, check the temperature with a candy thermometer - you're aiming for 220°. I'm usually a little impatient with projects like this, so I go with a slightly softer jam (218° or so).

    While jam cooks, fill the largest pot you have with water and place some sort of rack on the bottom (I use a lobster pot that comes with a fitted strainer, so I just use that strainer). You don't want the jars to touch the bottom of the pot. Bring to a boil. Place clean glass jars in the water and boil for at least 10 minutes to sterilize. Water should come to an inch or two above the tops of the jars. Prepare lids according to manufacturer's instructions.

    Remove jars from water when the jam is done. Fill jars with jam, leaving 1/4 inch headroom on top. Wipe the rims of the jar so they're clean and place on the lids on the jars.

    Place the jars back in the boiling water, put the cover on the pot, and process for 10 minutes (start timing when the water returns to a boil if it has become cooler). Carefully remove the jars from the pot and place on a kitchen towel to cool. You will hear the jars seal shut as they cool.

    Sunday, September 27, 2009

    Real Deal Peanut Butter Cookies

    A few weeks ago, I got the sudden urge to make old-school peanut butter cookies. You know, pressed down with fork tines and all. But most peanut butter cookies don't cut it for me - the peanut butter flavor is subdued by the flour, and you have to keep eating them to get sufficient peanut flavor. (Not to mention the fact that they're usually made with processed peanut butters that don't just taste of peanuts.)

    So with a quick Google search for "flourless peanut butter cookies," I found about 40,000 versions of this one recipe. It's ridiculously easy, and because it's so simple, you can play with it however you want. I used an all-natural peanut butter (ingredients: peanuts, salt) because I prefer the taste, although it makes the texture of the cookies just a little bit more delicate. I also sprinkled chopped chocolate on some cookies, but I ended up preferring the plain peanut butter cookies much more. If you play around with this recipe, let me know what you choose to do. Chopped peanuts would be delicious, or you can make them more like thumbprint cookies and add a dollop of jam to the tops.

    Flourless Peanut Butter Cookies

    1 cup peanut butter, smooth or chunky, at room temperature
    1/2 cup brown sugar
    1/2 cup white sugar
    1 egg
    1 tsp baking soda

    Preheat oven to 350°. Combine peanut butter and sugars in a bowl and mix until well combined. Add egg and baking soda and continue to mix until well combined. Roll dough into small balls and place on a parchment-lined baking sheet. Press the balls down with a fork to create a criss-cross pattern. Bake for 10 minutes. Let cool slightly on the baking sheet before transferring to a cooling rack. Between batches, cover the dough with plastic wrap, as it will dry out and get crumbly.

    Friday, August 14, 2009

    Julia Child's Hungarian Shortbread

    Julia Child is seriously everywhere right now. I've been debating whether to even write about Julie & Julia or the fact that Mastering The Art of French Cooking is currently the #2 seller on Amazon, since everyone else is writing about that too. I will say that I ended up seeing Julia & Julie twice (once with this amazing group of food bloggers) and loved every minute of it (but especially when they showed Julie's husband working at Archaeology Magazine - made me miss all my awesome co-workers at the AIA).

    So in honor of what would have been Julia Child's 97th birthday tomorrow, I decided to try one of her recipes. I've had her Hungarian Shortbread before, as part of the prix fixe brunch at Gaslight (they also sell slices a la carte) and loved the buttery, crumbly texture. That wonderful texture comes from freezing and then grating the dough - it's a bit of a pain in the ass, but the results are so delicious that I would do it again. Other than that, this recipe is really easy and makes about a million bars (you can, of course, cut to whatever size you want, but they're so rich that small pieces don't feel stingy).

    Julia Child's Hungarian Shortbread

    4 cups flour
    2 tsp baking powder
    1/4 tsp salt
    1 lb (4 sticks) unsalted butter, room temperature
    4 egg yolks
    2 cups sugar
    2 cups jam (whatever flavor you want - I used homemade ginger nectarine butter)
    Confectioners' sugar, for dusting

    In a medium bowl, combine flour, baking powder, and salt, and set aside. In a large bowl, beat the butter until pale and fluffy. Add the egg yolks and sugar and beat until well combined. Slowly add in flour mixture and mix until the dough just begins to come together. Form dough into a ball and cut in half. Wrap each half in plastic or wax paper and freeze for at least 30 minutes.

    Preheat oven to 350°. Remove one piece of dough from the freezer and grate into a 9x12" pan (use the large holes on the grater). Pat the dough down evenly. Spread the jam over the dough, then grate the other piece of dough over that. Pat the top down lightly (don't compact it too much). Bake for 40 minutes. Remove from the oven and immediately dust with confectioners' sugar (the sugar will get soaked in a bit). Cool completely before cutting.

    Monday, March 16, 2009

    Girl Scouts Cookie Creations

    I've already mentioned my love of Girl Scout cookies. When I saw the announcement for the Cookie Creations event from my local Girl Scout council, I asked my friend Mel to join me for the evening. Mel and I were G-Scouts (as she calls it) together for 12 years - that's a lot of cookies!

    The theme of the event - Cookie Creations - was desserts inspired by and using Girl Scout cookies. Eight chefs from local restaurants participated, creating their own confections by using GS cookies as an ingredient. I've done this myself from time to time, but the best I ever got was crushing up Thin Mints and adding to Rice Krispie Treats (awesome, by the way, and worth trying out!). I couldn't wait to see what the chefs would prepare.

    When we arrived, the place was already packed. Leave it up to the Girl Scouts to be punctual. The room was lined with tables for each chef and their cookie creation, and the crowds around each table were thick. In the order that we tried them:

    Chef Peppino from DaVinci Ristorante created a Mint Caramel Cheesecake, featuring Thin Mints and Caramel deLites. There was a lot going on, what with the mint, caramel, and coconut, but the ratio of crust to cheese was good (and I'm not even a fan of cheesecake).

    Chef Morris from Old Town Bread created a White Chocolate and Pink Grapefruit Tart, featuring Shortbread (Trefoils if you're old school, or your council still uses Little Brownie Bakers). It was delicious, if somewhat difficult to eat - the pink grapefruit marshmallow really towered over the rest of the dish. Most shortbread cookies work excellently as the base for a tart, and this was a good example of that use. I might try making just these marshmallows some time...

    Chef Personius from Burtons Grill created the Triple Decker Caramel DeLite, featuring Caramel deLites and Daisy Go Rounds. It was basically a Caramel deLite topped with butterscotch and vanilla puddings and whip cream, making it very messy to eat. It would have, however, been excellent as a trifle, with the Caramel deLites chopped up a bit.

    Chef Woodfine from Troquet created a Peanut Butter Crunch Torte, featuring Peanut Butter Sandwiches. The peanut mousse (sandwiched between fudge and ganache) was so creamy that it was hard to tell there were any cookies in there at all. This was decadent to be sure, but it was the only one I could see myself enjoying a whole plate of at the end of a meal.

    Chef Percoco from BOKX 109 American Prime created a Thanks-a-Lot Butterscotch Cheese Cake with Thin Mint Sauce, featuring Thanks-A-Lots and Thin Mints. I wanted to like this, but I found the Thin Mint sauce to be wicked overpowering, which, when combined with the texture of the cheesecake, had me thinking of toothpaste. Separately, I'm sure each part was very tasty.

    Chef Kilpatrick from Sofra Bakery and Oleana created Peanut Butter Parfait Bars, featuring Peanut Butter Sandwiches and Peanut Butter Patties. Yum! These were topped with a piece of salted peanut brittle, which provided something that many desserts are missing - salt! And I appreciated that she used both types of peanut butter cookies in the preparation.

    Also featured, although I got no picture because it was pretty melty, was a Caramel deLite and Shortbread Gelato Sandwich from Chef Marini from Olivadi. It was a very simple preparation, with crumbled shortbread as a base, a scoop of caramel gelato in the middle, and a whole Caramel deLite on top. Tasty, but very messy.

    Also also featured, again with no picture (this time just because I was getting jostled around and couldn't pull the camera out), was a Key Lime Yogurt Tart from Chef Hooper at Great Bay, featuring Daisy Go Rounds. Again, I'm not a fan of cheesecake, and also not a fan of Greek yogurt (I hate the way yogurt tastes), so this one was clearly not for me, but Mel seemed to enjoy it.

    After everyone had a chance to taste the confections, voting began. There were three judges for an "official" winner, but attendees were encouraged to vote for the crowd favorite. Mel and I both gave our votes to Troquet's Peanut Butter Crunch Torte, but I had a hard time deciding between that and Sofra's Peanut Butter Parfait Bars. This is especially surprising to me because, while I enjoy peanut butter desserts, I tend to prefer mint - but the Thin Mint offerings just didn't wow me. I was really surprised to find out that the actual winners were Olivadi's Gelato Sandwich (judge's choice) and Great Bay's Key Lime Yogurt Tart (people's choice) - neither of my favorites won!

    Have you made your own Girl Scout cookie-inspired desserts?

    Tuesday, March 10, 2009

    It's Girl Scout Cookie Time!

    OK, I'll admit it - I'm a Girl Scout. Like, still a Girl Scout. My lifetime membership card is kicking around somewhere in my desk, amid a pile of pens that may or may not actually work.

    So every year when Girl Scout cookie time rolls around, I can't help but feel that pull of nostalgia, bringing back memories of wandering around my neighborhood with my sash tied over my huge winter coat, taking orders from the neighbors who I only saw at cookie time and Halloween. Nowadays, I never seem to have my act together enough to actually pre-order cookies, but it's pretty hard not to find a table set up somewhere (the last one I saw was inside the Harvard Square T station) with girls selling boxes of cookies.

    But man, have Girl Scout cookies come a long way since I was a kid. This coming Thursday (3/12), the Girl Scouts of Eastern Massachusetts will be hosting the 4th Annual "Evening of Cookie Creations" at the Hotel Commonwealth in Kenmore Square. The event will feature seven local chefs and their creations (all of which feature Girl Scout cookies as an ingredient), and winning creations will be picked by a panel of judges and by the crowd. It sounds like a great time, and I'm excited to see what they chefs come up with.

    Tickets are $30 (or two for $50) and more information is available here. See you Thursday!

    Friday, December 19, 2008

    Gingerbread Always Makes It Feel Like Christmas

    As the other half of my Operation Baking GALS package, I opted for gingerbread men. I love how the mixture of molasses and spices can evoke the holiday season at any time of the year. I didn't decorate these like I did last year (I didn't think they would stand up as well to the shipping), but I still think they turned out well.

    I especially enjoy this recipe because the cookies don't end up very hard (well, at least if you don't overbake them). They puff up in the oven, rounding out any mistakes you might have made (although, that means you don't want to use any cookie cutters with highly intricate details, as they tend to get a little lost during baking).

    Easy Gingerbread Cookies

    1/2 cup (8 Tbsp) butter
    1/2 cup sugar
    1/2 cup molasses
    1/4 cup water
    1 tsp vanilla
    2 1/2 cups flour
    1/2 tsp baking soda
    3/4 tsp salt
    1 tsp ground ginger
    1/4 tsp ground cloves
    1/4 tsp grated nutmeg
    1/4 tsp black pepper

    Cream together butter and sugar. Beat in molasses, water and vanilla. Gradually add the dry ingredients and mix until smooth and well-combined. Divide dough into three pieces, wrap in plastic wrap, and flatten into disks. Refrigerate for at least 2 hours.

    Preheat oven to 375°. Roll dough to 1/4 inch thickness. Cut with cookie cutters of choice and place on a parchment-lined cookie sheet. Bake for 9-12 minutes, and move to a wire rack to cool.